
A Top-Tier Resource for SMS Marketing

SMS vs MMS: What’s the Difference and When to Use Each?
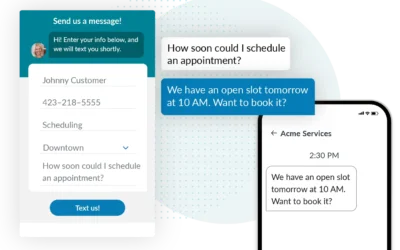
Text messaging is still considered a super strong communication channel for building a direct relationship with customers. Businesses rely on text messaging — everything from sending small reminders to large marketing campaigns. Yet many decision-makers still wonder:...

A2P 10DLC for Software Vendors: What Collections Platforms Need to Know
If you've been researching SMS for your collections platform, you've encountered A2P 10DLC. You know it's mandatory. You may have read that it requires registering your brand and messaging campaigns with The Campaign Registry. But the registration requirements facing...

SMS Integration for Collections Platforms: Build vs. Buy
Every collections platform CTO faces this moment: clients are asking for SMS, the compliance requirements are clear, and the roadmap has no room. Choosing the right SMS API collections software - whether to build a compliant layer from scratch or integrate one that...

How Debt Collection SaaS Companies Add Compliant Texting Without an Engineering Sprint
Your clients are asking for SMS. Not eventually – now. They've seen response rates on text message campaigns, they know it works for collections, and they want it inside your platform. The question isn't whether to embed SMS in your debt collection platform - it's how...
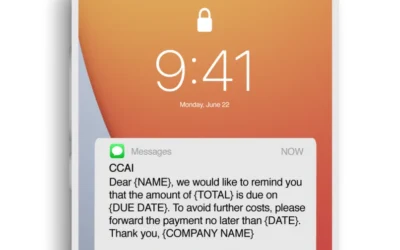
Days Past Due Automated Campaigns: The Set-It-and-Forget-It Approach to Loan Collections
Your collections team is drowning. Every month, hundreds of accounts go past due. Each one needs attention—a reminder here, a follow-up there, an escalation when things get serious. Multiply that by the number of days past due, and you’ve got thousands of manual...
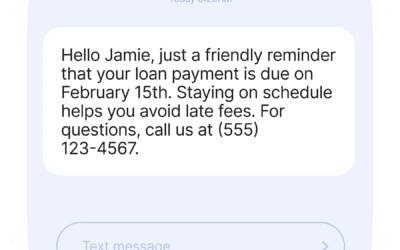
Auto Loan Text Message Reminders: A Bank’s Guide to Reducing Late Payments
Auto loan delinquency costs banks billions annually. The American Bankers Association reports that delinquency rates fluctuate between 2-4% depending on economic conditions—and every percentage point represents real money walking out the door. The frustrating part?...

How Banks Keep Equipment Finance and Dealer Loans Separate in SMS Campaigns

Equipment Loan Payment Reminders: How SMS Reduces Delinquency by 35%
Late payments cost equipment finance companies millions every year—not just in lost revenue, but in collection costs, strained customer relationships, and administrative overhead. Yet most lenders still rely on the same tired playbook: email reminders that go unread...